I tried out a new to me pattern last year. It has been in my collection for a while. The cover photo is super cute, and I decided to style it a tad differently. I modified it in a couple places for a better fit, and an easier to sew neckline. What I loved was the option to color block. It is fun to make a statement top with two different prints. One print may be overwhelming. Tone it down with some stripes. Or you may love a certain print, but that print, or the colors in it may not love you back as much. Easy, color block the part closest to your face in a color that suits, and pick up that color in the print. Also a great use for scraps. I ended up making three modified Merryweathers for me and wear them often.
A recent photo of me and my grand daughter wearing pants from the same fabric provided me some inspiration. I was wearing the Merryweather made with a Bicycle print from Art Gallery, and she was wearing her Piscean pants made from scraps of my Sculthorpe pants. It was when she noticed the print and said the word bicycle, grandma mode took over. That is three syllables! I checked to see if there was more of that fabric. Sadly that one was gone, but this one is still available. Love the weight and wearability of these fabrics. While I am waiting for the bicycle, taco and tiger fabric, I put together a top with cars.

I projected the size 3 Neverland tee onto my pattern paper and traced. Picked a spot about 3/4 inch below the arm pit and made that my seam line. The cut line is 1/2 inch above that as marked with the dashes and scissor icon. Pro tip: Write the measurements of your bands on the pattern pieces. You will thank yourself later. I had previously made the Neverland tee in scraps from a white shirt for her uncle. Love how it fits.

To get the top yoke of the Mini Merryweather, I traced the top of the Neverland Tee down to my seam line or stitch line, then added half an inch for the seam allowance. Easy Peasy! On the photo below, I added a notch to the center front of the top, and the center of the sleeve and I should have added one to the center back, for ease in stitching. This fabric is an interlock and worked really well. I planned this top to use the cotton lycra print for the bands, so these pieces worked fine in interlock.

Yokes made from stripes. I cut the stripes by hand with scissors so the bottom of the stripe would be perfectly even.
Note for adult sizes. This color blocking is an awesome spot to add some shaping. Add a slight downward curve on the yoke front and a slight upward curve on the body front, ending up with 1/2 to 3/4 more at the center to create a subtle dart like seam, that no one will notice, but you when you try it on and it fits great, and doesn’t pull up in the front!

The toile I made before Christmas used a cotton lycra doodles from Joann, and a cotton interlock from Kathy’s Lace and Elastic. I like to use dead stock and deep stash/destash fabric for my first try.
Do all the sewing, just as the Merryweather pattern instructs. Topstitching adds a professional touch, keeps the serged seams flat, and makes for a sturdier garment. It is fun to play with colorblock options. I often let the type and amount of fabric I have available determine what goes where. Just use the fabric with best recovery and lycra content in bands.

And here is the same photo with the wonderful Art Gallery fabric, and stripes from the SUAT site. Have fun playing with different prints in the sleeves/yoke/body/bands.

I chose to make cuffs from the stripes to help push up too long sleeves that will grow with the baby. When I cut the stripe to straighten the fabric along the stripe, I cut close to the previously cut spot, which rolled a bit. To solve that, I could have cut off an additional couple of stripes, but I am too frugal to waste fabric. I used an overcast foot here to pre baste with a wide zig zag, which will seal the edges of the cuff together, and make for an easier time attaching the cuff to the sleeve. This basting if close enough to the edge will not need to be removed later and will stretch beautifully.

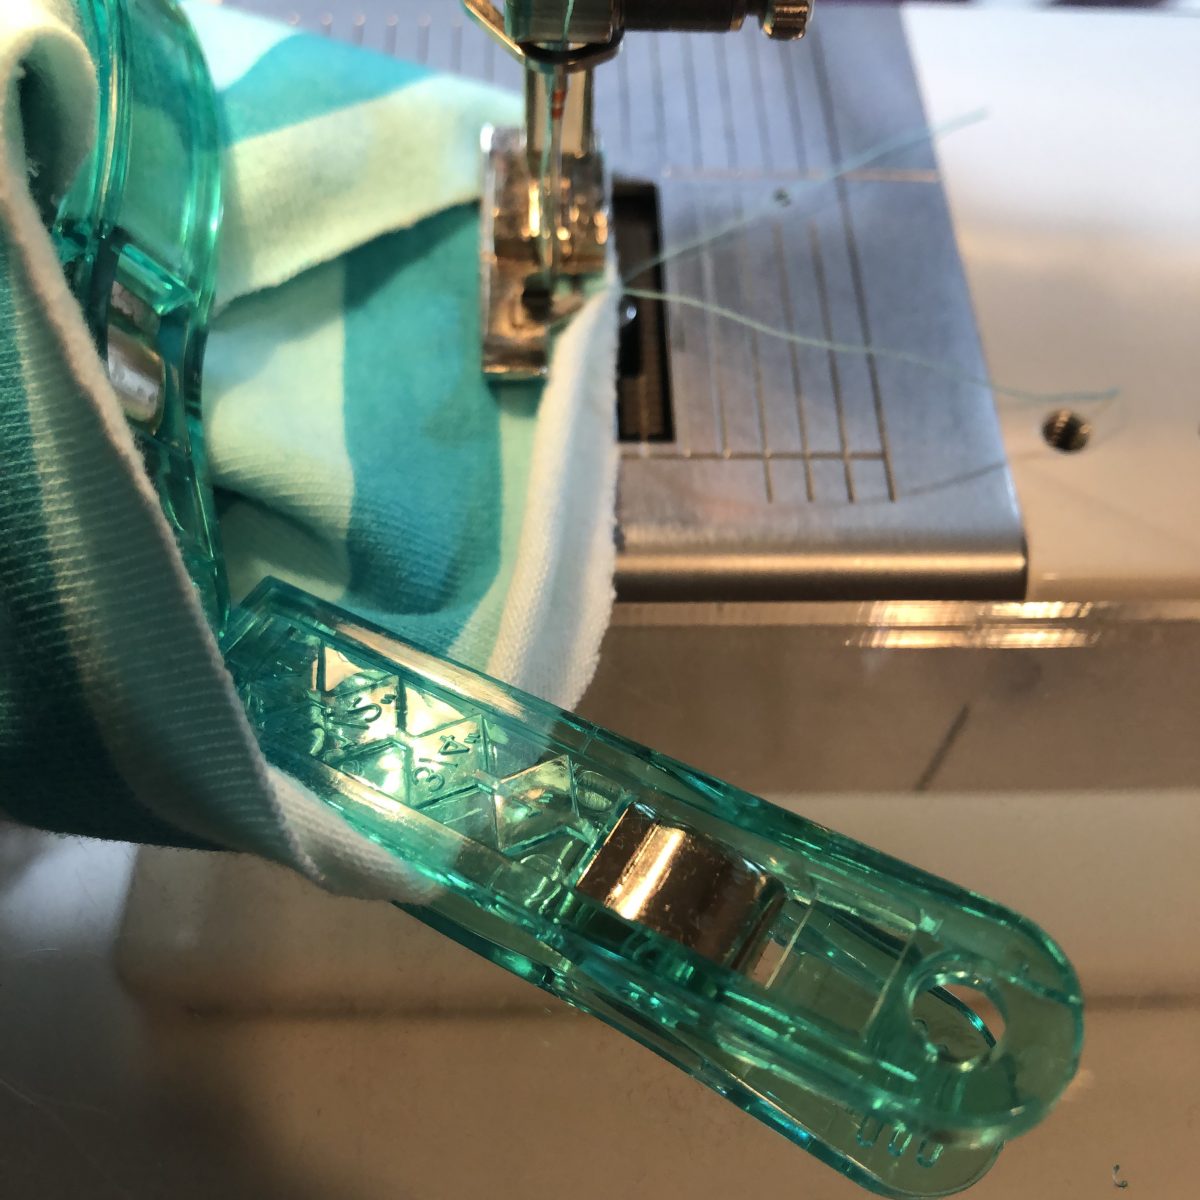
Clips can help get started and are useful if the roll is particularly strong. Pro tip: When using a foot like this that has a finger to keep the stitch from tunneling, walk the first stitches by hand to be sure the needle easily clears all metal parts of the foot.
The question is to stitch with the bands up, or with the bands down. Here is one way. I clip the seam line and the opposite point around the circle and start in the middle of the clips. Serge or use a stretch stitch. Wow, you can see the tiny clip in the band in this photo.

This illustrates the waistband of the matching joggers, which is made quite stable by zig zag basting first, can be stitched on the bottom. A stabilized band can be sewn on the bottom since it will behave itself a bit better. Place the main fabric, which may still want to roll, on the top where it can be seen and controlled. Clip in several places and start stitching in the middle of a pair of clips. Bands can be attached either way. Try both and see what works best for you.

Two finished Mini Merryweathers with different color block options, and either cuffed or hemmed sleeves. Both were made with pants to match/coordinate. More on those later.

This post is filled to the brim with affiliate links. If you purchase a pattern or fabric with these links, it will cost you nothing extra, and the seller of those items may pay me a small commission, which is greatly appreciated. Thank you, and Happy sewing! – Joan
